Windows IDE Setup
Topics Covered
- Setup your development environment
- Build your first React Native app
Install the Expo CLI
The easiest way to get started building React Native apps is to use the Expo CLI together with Visual Studio Code. Most students have already worked with VS Code in other courses but likely haven't seen or even heard of the Expo CLI. Expo CLI is a set of tools that will allow you to start writing and running React Native apps in just a few minutes.
-
Install Node 14 LTS or greater on your machine, you can download it
here.
If you already have Node installed, start the Node.js terminal to ensure you have
version 14 or
later installed. The version is displayed on the first line in the terminal.

- Install Visual Studio Code if you don't already have it installed. You can download it here.
- Start Visual Studio Code.
- Open the Terminal window. You can click on the Terminal menu, then on New Terminal.
-
Type the command:
npm install -g expo-cli
You may notice some modules are deprecated, this is normal and you shouldn't cause issues. -
Type the command:
npm install -g sharp-cli
Build your first React Native app
- If Visual Studio Code is not already running, start it.
- Click on the File menu, then Open Folder.
- Choose or create an empty folder then click on Select Folder. This folder will be used to store your React Native apps in. If you receive a message about trusting the authors, you can click Yes, I trust the authors.
- Open the Terminal window. You can click on the Terminal menu, then on New Terminal. The terminal will open within the folder you selected previously.
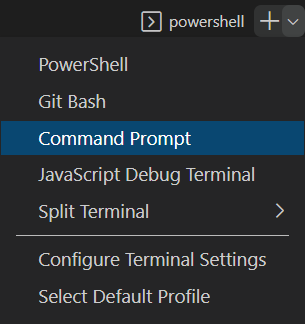
-
Change to a Command Prompt terminal by clicking on + then choosing
Command Prompt.
-
Type the command:
expo init AwesomeProject -t blank
It will take a moment to configure the application. -
The step above will create a new application in a sub-folder with the name you specified
(AwesomeProject). To run the app you will need to change into the appropriate folder by
typing the command:
cd AwesomeProject -
To start your web app, type the command:
npm start -
Let's take a look at the application in our web browser. Type the command:
W
You may receive a prompt to install required dependencies, please proceed by pressingY. When the installation is complete, you will need to runnpm startagain then pressW. - Your web browser should open automatically and display the message: Open up App.js to start working on your app!. You're ready to go! Keep the browser open and continue to the next step.
-
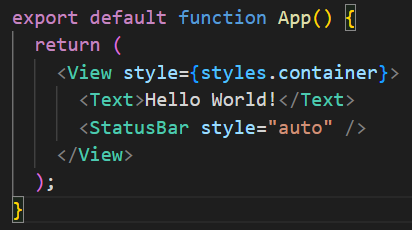
Back in VS Code, open the file App.js for editing. On line 7, change the text within
the
<Text>element. Change it to readHello World!.
- Save the file then go back to your web browser. The web page should have automatically refreshed. Pretty awesome!